Stock change by identifier
Use this transaction to perform the following actions:
Move stock from a stock line, based on a selection of stock characteristics and stock filters. It can be a location change and a status change.
-
You cannot perform a unit change.
-
You cannot perform a location change on a stock line linked to a LPN.
Prerequisites
In Sage X3, perform the following actions:
Functional prerequisites
-
Function profile (GESAFT)
Open: Setup >Users > Function profile
Your profile code needs to have an authorized access to the SCS Select by identifier function (CWSBSCS).
How to create a stock change
Open: By identifier > Stock change
To create a stock change, you need to enter information on 3 pages:
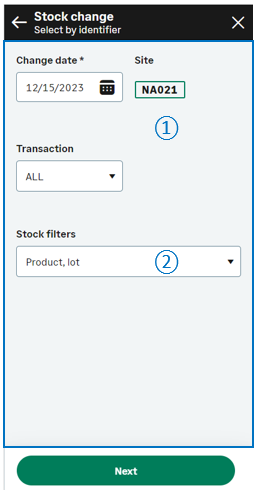
- The initial page is used to perform the following actions:
- Set the Change date and the entry Transaction.
- Select the Stock filters.
-
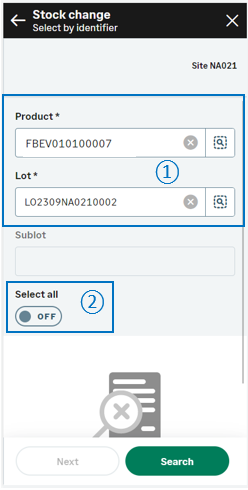
The second page is used to define the values for the selected stock filters and to select the stock lines.
-
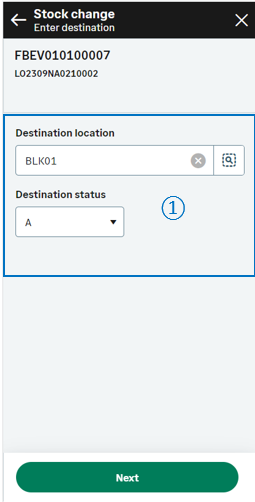
The third page is used to enter the stock destination information.
When you have completed the changes for this stock lines, you can create the stock changes document.
Operating mode
- In the initial page, check that the Change date, Site and Transaction default values are correct.
- From the drop-down list, select a set of Stock filters to be used and tap Next.
- The selected stock filters are displayed. You need to enter a value for each of them.
-
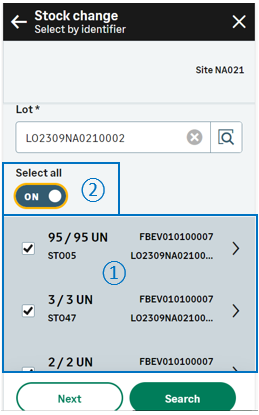
Select the lines to be moved. You have 2 possibilities .
-
You can select all the stock lines at the same time without checking them.
-
Turn the Select all switch on.
-
Tap Next.
-
-
You need to check the stock lines before selecting the lines you need to move.
-
Leave the Select all switch turned off.
-
Tap Search to display all the stock lines that match the stock filters.
-
You can select one by one the lines to move. You can also turn the Select all switch on to select all the lines at the same time.
-
Tap Next.
-
-
-
Enter the destination values.
-
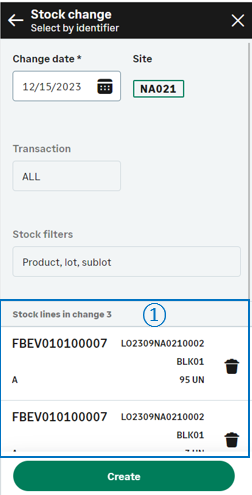
Tap Next. You are automatically redirected to the initial page. The stock lines to be moved are listed at the bottom of the screen. You are ready to complete one of the following actions:
-
Validate the creation of the stock change document: Tap Create.
-
Delete a line: Tap the delete icon.
-
Step by step
Select identifier initial page
 |
|

Select by identifier
 |
|
Select by identifier - List of stock lines
This page displays only when you leave the Select all switch turned off on the previous page because you need to search and check the stock lines.
 |
|
Stock change - Enter destination page
 |
|
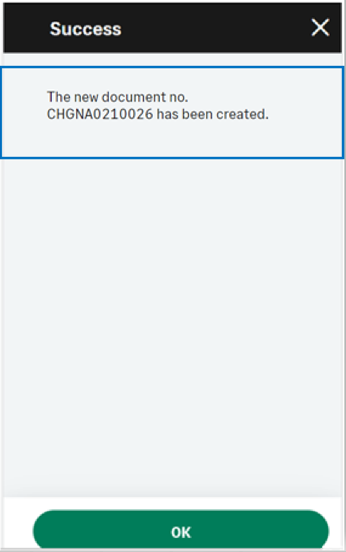
Create the stock line change document and generate stock movements
|
||

|
The list of stock lines which will be part of the change provides the following information at the bottom of the page:
Before creating the stock change document, you still have the possibility to delete a saved stock line change: Tap the delete icon. |
|
|
Tap Create when you are ready to validate the stock change creation and print the stock labels. Note - settingsTo print labels, refer to the functional prerequisites.
|
|
|
||
|
Note - informationTo access a Select by identifier - Stock change transaction, CWSBSCS must be authorized.
To create a Select by identifier - Stock change transaction, GESSCS must be authorized. |
|||
| Field | Description | Sage X3 field code | Table (data creation) |
|---|---|---|---|
| Site | Receipt site | STOFCY | SCHGH |
| Change date | Effective date | IPTDAT | SCHGH |
| Product | Product code | ITMREF | SCHGD |
| License plate number | LPN | LPNNUM | SCHGD |
| Location | Location | LOC | SCHGD |
| Destination location | Location of destination | LOCDES | STOJOU |
| Lot | Lot number | LOT | SCHGD |
| Sub-lot | Sub-lot number | SLO | SCHGD |
| Status | Status | STA | SCHGD |
| Destination status | Status of destination | STADES | SCHGD |
| Quantity to move | Quantity in packing unit | QTYPCU | SCHGD |
| Quantity to move | Quantity in stock unit destination | QTYSTUDES | SCHGD |
| Unit | Packing unit | PCU | SCHGD |
| Destination unit | Packing unit of destination | PCUDE | SCHGD |
| Conversion factor | Packing unit to stock unit conversion factor | QTYPCUSTUCOE | SCHGD |
| Destination conversion factor | Packing unit to stock unit conversion factor of destination | COEDES | SCHGD |
| Serial number | Starting serial number | SERNUM | SCHGD |
| Identifier 1 | Free field 1 | PALNUM | SCHGD |
| Destination identifier 1 | Free field 1 of destination | PALNUMDES | STOJOU |
| Identifier 2 | Free field 2 | CTRNUM | SCHGD |
| Destination identifier 2 | Free field 2 of destination | CTRNUMDES | STOJOU |
| Custom field 1 | User area 1 | STOFLD1 | SCHGD |
| Custom field 2 | User area 2 | STOFLD2 | SCHGD |